Thursday, September 13, 2012

New Mac Eyeshadow Quad - Colour Added

This makeup is actually from around March and I just found the pictures and figured I should post them :) 

I just got the new MAC eyeshadow quad and was super excited to try it out. I decided to go bold with it!

What do you think?

This pallet is called "Colour Added"

It's kind of hard to tell in the image but it is a pearly white, iridescent yellow, a dark teal color with sparkles, and a blue/grey. 


 I first used an eyeshadow primer to make sure I had good staying power, it also makes the shadow pop more. I used Urban Decay Primer Potion. 
I added the yellow into the inner corners of my eyes then added the teal in my sockets. Oh can't forget I also used the colors on my lower lash line, so yellow inner corner to the middle and the teal on the outer and blended. I darkened it up with the grey and highlighted my brow bone with the pearly white. Then I blended like crazy! :) 

I created a double wing with a pen eyeliner and pulled it into the corner of my eyes. (I was going kinda Cleopatra here). Then to make the eyeliner wings pop more I used a white eyeliner and used it in between the two wings. 
 I finished it off with a coral pink blush from MAC and the VIVA MAC lipstick. Didn't want to compete with the eyes with this look :)

Hope you all enjoyed!


Monday, August 13, 2012

Amazing Spring Cleaning List

I found this great Spring Cleaning checklist on The Complete Guide to Imperfect Homemaking and I don't know about you but I'm not a fan of cleaning the whole house or remembering to do certain things (like the dishwasher :) so it's nice to have something like this to reference. 

Although..... I know I will probably end up skipping a lot of these steps tee hee. 

Since I'm kinda crazy :D and like to practice my graphic skills I put this little graphic together to make a list like this a little prettier. 

Let me know what you think. 


This is just a little peek. There are 5 pages total 


You can upload this checklist graphic here

Have a great Monday! 

PS. Sorry it's been so long. My posts will probably be sparse again since I will be starting school next Monday! 

Monday, June 25, 2012

Wedding Day Makeup and Braided Up Do Hair

The wedding this past weekend was absolutely gorgeous. My sister looked absolutely stunning. And I couldn't even look at Eric during the ceremony without crying, he was so full of joy and emotion. To say it was beautiful is an understatement.

I just wanted to do a little update on my makeup and the hair. We went to a salon in Spokane Valley called Dimensions and they hooked us up! It was an amazing deal for the bridal party. $65 for your nails, makeup, AND hair. Normally up dos start at $50 alone so we couldn't pass this up.

I have been obsessed with braids recently so I just had to incorporate it into my Maid of Honor look :)

Take a look, what do you think?


I went simple on my makeup as I didn't want to out do the bride :) I just had a smokey eye look with browns and grey with a little lashes added on for oomph. 
I was super stoked for this. Although this was the most makeup I think I've worn since Halloween haha.. They had to do it a little heavy for photos. 


I was so busy throughout the day that I completely spaced on taking pictures of the full complete outfit! Good thing we had a photographer. I will update when those pictures are ready for release. Such an awesome day! I was overcome with joy!


Hope you all have a fabulous Monday!


Friday, June 22, 2012

My Sister's Wedding Is This Weekend!

My sister is getting married this weekend on Saturday! Yay! I am the Maid of Honor so I have been incredibly busy with trying to get all the artistic stuff and technical things done for her! EEEK! I am so excited!

My sister loves, loves, loves rainbows so she is doing a Rainbow themed wedding. It is going to be gorgeous. Color everywhere! And it will be in a garden with a pond which will make it even more lovely.

This was her inspiration for starting things off...


She found some flower stamps because she wanted to create her own invitations. My sister is very hands on and tried to make this wedding cheap and also very special and one of a kind. I think doing things yourself adds a nice touch and the guests appreciate it as well. I created the program for her as well using these stamps. Isn't it just cute! I made a front and back, I think it is called tea-length style? What do you think? 


As you can tell it's not quite finalized since it says blah blah blah :]

And to leave you with something fun for the weekend is this super cute nail design my friend showed me from Tumblr. I think it fits the theme of this post quite well don't you? :)  I will do a tutorial on this soon as it is just the cutest! And perfect for summer time! 


Enjoy your weekend! 


Wednesday, June 20, 2012

First EVER Eyebrow Wax! :]

I wrote this post last year about 9 months ago when I was on Tumblr and I figured I would share with you :)

-
I’ve never gotten my eyebrows done and today I finally decided to do them since I’m getting tired of plucking and not really having a shape other than flat… 

And I was always scared to try and create my own shape in fear of going overboard or having them look like two completely different… things on my face. 

I never realized how different my eyebrows actually were. One is definitely shorter than the other. You can tell because my left side kinda stops while my right brow continues downward in a nice arch.. Haha.. 

Well here it is :)

I’m pretty happy with them.  I think it made a HUGE difference. 


I did a photoshoot in the first one so my makeup is a little elaborate and well I’m not really wearing much in the second photo..


If you've ever been nervous about getting your eyebrows waxed... well my advice it just go with it!!! But go to someone that has experience so you are happy with your results. And if not, well they will always grow back. 

New Look!!

I'm in the process of completely re-vamping my blog. I'm updating the look of it and adding a bunch of new stuff. This blog will not only include beauty tips but will also feature crafty goodness, yummy foods, and DIY fun. I'm also in the process of creating an etsy shop once my sister's wedding is over (YAY Weddings!) :]

I hope to see you all soon.

Sunday, March 11, 2012

St. Patty's Day Make-up


I was fooling around with some greens and decided to do a pre st. patty's day look. I actually went to a roller derby bout tonight and decided to wear this since the teams colors were black and green but it also worked out for this next holiday yay! 

Used a nice primer potion from Urban Decay and used a cheapo palette from BH Cosmetics Edition #2. I started with a really bright shimmer green on the lid and a lighter yellow/white for my brow bone. Then went in with a darker green shade for my crease but I found that it wasn't dark enough and blended in some black to give my eye more depth and went in with a pale green color in the inner corners of my eye. I lined the bottom lashes with a black kohl liner from MAC (Feline) and topped it with shadows in a gradient, light to dark from my inner corner out. And topped it with some translucent glitter from MAC just on the ball of my lid. Took some cream liner and gave myself a little wing and lined my water line. Had fun with this one.
Hope you enjoy :)


This one was actually from the end of the night :) but it was with my better camera (aka not my phone) and with flash. 


This was the beginning of the night with bathroom lighting and my phone camera. 
(For some reason I've noticed I always do some silly smirk whenever I take pictures of my makeup. I usually always smile with teeth in normal pictures but I think it makes my eyes squint to much haha so it's hard to see the colors on my lid)


Did some under the eye gradient liner action and I wanted to actually see it :)
(I have a thing for stars, hence my derby name Annya C Stars)

Hope you all enjoyed this look. Another one will come this weekend as the day comes closer. Might throw in some gold for the leprechauns.  Close ups in the pictures below. 


Thursday, February 23, 2012

Colorful Hair

Dyeing hair is sort of my hobby. I love creating new looks and having lots of colors. My hair is kind of a statement especially since I am kinda shy when you first meet me. 

This is my hair as of today. I just did it last night. Hope you like it. More pictures when I get batteries for my camera. ( Had to use my sucky camera on my phone).


This is what my hair looked like at the beginning of December.


Monday, February 20, 2012

DIY Nail Polish Rack

Hey everyone! 


I was looking around for a better way to store my nail polish. Right now I have them in a little rack that's used to hold little tiny objects. My collection is quickly growing, especially now that I am back in the states, and I need a better way to store. So I was looking online and wanted a cute way to display my polish on the wall and I saw a few I liked but the they were pretty spendy. I googled a DIY polish rack and saw that it was incredibly easy to make! 


I made mine out of:

  • black foam board
  • glue gun
  • ribbon
  • glue sticks
  • pencil 
  • and a box knife


I started to make this and realized I should have done a better job cutting the boards to make them flush with the edge and that I remembered how much I dislike using glue guns. They leave strings everywhere! I decorated it with some ribbon to hide all the spots from the glue. I didn't want too much color since the polish will do that for me. 


The tutorial I used explained the process really well so I won't go into how to do it. 
DIY Nail Polish Wall Rack

I haven't tested it yet but I will get it all up and ready tomorrow with updated pictures :)


Thanks for reading! 
Annya


Monday, February 13, 2012

Happy Valentine's Day! Nails - of the Week


Nails of the Week. Valentine's Nails :) Tried something new today. Wanted to be festive for V-day. Used China Glaze Concrete Catwalk as the base and OPI An Affair in Red Square and a Konad design. The hearts didn't transfer all the way so I had to do them manually (really quickly). I will probably do a different design for our Valentine date night this weekend. :)

Enjoy :]

Thursday, February 2, 2012

Nails of the Week!

I've been back from Australia since November and I have really been slacking on my nails! So here is just an update on what I've done since then and then what I have on my nails today. 


My Christmas Nails

The photo is a bit blurry but you get the gist.

I also received Nails Inc. Magnetic Polish in silver, purple, and teal. I only tested the silver here, I will do one of the other two once I get the teal one back from my sister :) It is such a cool effect. 


This was my nail design last week. They are my Spring time Nails :) I don't know about you, but I'm ready for it already! Especially after spending almost 5 months in Australia, this winter is getting me down!  It was a zebra design on top of 3 blended colors, light green, purple, and a light pink with a bit of glitter polish on top.


And this is the design of the week. I thought it looked a bit Grecian, but one of my friends pointed out that it looks a bit Kiwi (New Zealand, All Blacks - Rugby Team) but alas the colors used are a dark purple (OPI Siberian Nights) and gold (OPI Glitzerland).  A white nail art pen was used for the design.  Hope you like it :)

KONAD!

I tried Konad for the first time ever before I left for Perth in late September. (I studied abroad last semester in Australia for those of you that are wondering how I traveled so much recently).  

I think I'm terrible at using Konad!  It was a lot messier than I thought it was going to be, but i think it turned out pretty good. I still haven't tried too many designs but I will definitely be trying this out more.

Water Marbling

This was my first attempt at Water Marble Nails. I think they turned out kinda retro, very tie dye :)
What do you think?


My first blog on Blogger!


How exciting! 
I have been using tumblr for a short time and have decided to add this one.  So this is pretty much a recap of everything I've done. :)

*A copy from my first blog with a little tweaks. 
When I was younger I always envied people with their beautiful nails and couldn’t ever get mine to grow strong and long. Also sports didn’t help much either. But after some researching and random youtube tutorials I found out what works best for me. I started my nail art obsession in May after my nails grew to a length that was long and for once in my life they were all the same length. 
Here was my first design I ever did. 

PANDAS! This design is courtesy of Cute Polish.  I changed it a bit by adding the dots around the French Tip. I felt that having a panda on each finger was a little much for my taste.
Products used

Sally Hansen Polish Xtreme Wear in white and black and a nice top coat. 
I used OPI Nail Envy as a base coat and this was before I learned what a good top coat was and it smeared my dots. 
A few more designs that I first tried. 
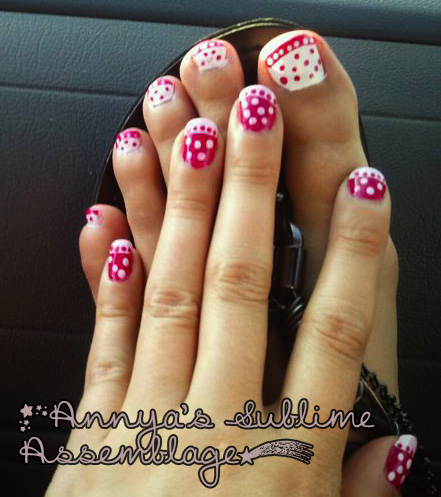
Just a pink and white polka dot design


I decided to try the panda design on my toes and I have gotten the most compliments ever from these! I did them right before I left for Australia in July :)


 I expanded on the panda design and messed around with trying new animals out. I thought the tigers turned out super cute ^-^


 Lots of dots! It looks more complicated than it actually is. It just takes lots of patience and time!


 My sister’s toes with Hello Kitty on the big toe. 


A few of my nails broke so I trimmed them down and did a short nail design. Once again polka dots. They are just so easy to do and always turn out cute!


 Flower design on my toes with little dots. (I love dots :D )


Probably one of my favorites that I have done. It’s a more sophisticated tiger look.  It’s perfect for when you are feeling wild!


Just a multi-colored french tip with simple flowers.


This was my failed attempt at a new design on my toes…. I had to fill it more to make it flow better. Trying new things is always interesting :]


Design of the week.
I saw this design online.. I had to try it out… cause I kinda like LOVE space. Its so mysterious and amazing. 


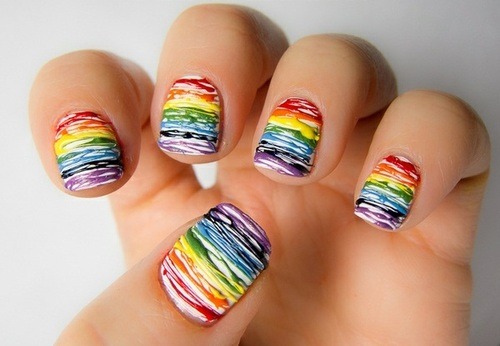
I got new nail gems!


I tried something completely different last week. I did a bunch of random lines with greens and purple, accented with black and silver and cute little silver gems.  It was my first time experimenting with the gems I bought.  I think it turned out really cool! 


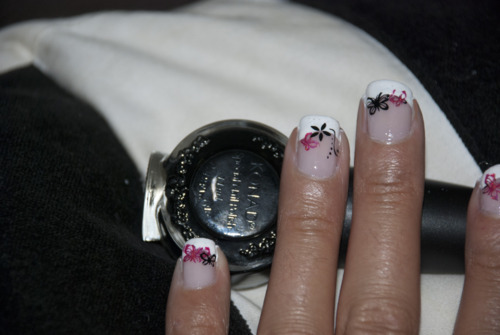
Black tips with red flowers and silver centers. Classy 


Starry Toes.
Thanks for reading! Follow me to keep up on cute new nail designs I come up with or come across… as well as all the other fun makeup things I encounter!